
 Last modified:
Thursday, 20-Jan-2022 02:40:21 UTC. Authored by: Rebecca J. Parker (rjp43 at pitt.edu | Twitter: @bcpkr396) Edited and maintained by: Elisa E. Beshero-Bondar
(eeb4 at psu.edu). Powered by firebellies. Last modified:
Thursday, 20-Jan-2022 02:40:21 UTC. Authored by: Rebecca J. Parker (rjp43 at pitt.edu | Twitter: @bcpkr396) Edited and maintained by: Elisa E. Beshero-Bondar
(eeb4 at psu.edu). Powered by firebellies.
Last modified:
Thursday, 20-Jan-2022 02:40:21 UTC. Authored by: Rebecca J. Parker (rjp43 at pitt.edu | Twitter: @bcpkr396) Edited and maintained by: Elisa E. Beshero-Bondar
(eeb4 at psu.edu). Powered by firebellies. Last modified:
Thursday, 20-Jan-2022 02:40:21 UTC. Authored by: Rebecca J. Parker (rjp43 at pitt.edu | Twitter: @bcpkr396) Edited and maintained by: Elisa E. Beshero-Bondar
(eeb4 at psu.edu). Powered by firebellies.First complete Git Exercise 1 to create your GitHub account, configure git on your computer, and join our class textAnalysis-Hub. You should complete this assignment on a computer you will likely be using the most this semester, because you will be configuring it to get it working routinely with Git and GitHub and navigating your own file directories. (You can always set up Git on other computers when you need to and access GitHub wherever you are.)
The goals of this assignment are:
git add, git commit, and git push it to the remote repository.git pull as well as add, commit, and push files from the textAnalysis-Hub. Upon completion of this assignment you should feel confident about pushing and pulling files using Git and interacting on GitHub. Our courses require weekly, even daily, Git activity, so you will get plenty of practice this semester. If you still feel uncertain on how to use Git or GitHub after completing this assignment please meet with a DIGIT peer tutor or Dr. B. We will gladly assist you so that you feel comfortable using Git and GitHub on a regular basis.
First navigate to our textAnalysis-Hub repository and clone the textAnalysis-Hub to your local computer. Follow our quick reference steps on cloning.
Once you have cloned the textAnalysis-Hub, navigate to the repo on your local computer.
Search through the directory and find the folder called Sandbox
. The Sandbox
directory is a space for you to practice adding, committing, and pushing files to.
Go ahead and save ANY file (okay, anything under 150MB and preferably a code or text file) to the Sandbox.
(You can click and drag a file into that directory or
save a file directly there from <oXygen>.) Notice others have added pictures, text
files, and a variety of code files. You can open any of these files, but try not to
delete any files you have not created yourself. You will only be able to push your new
file if we haved added you as a collaborator (which should have been done with
completion of Git Exercise 1).
Use command line to add, commit, and push your sandbox file to the textAnalysis-Hub.
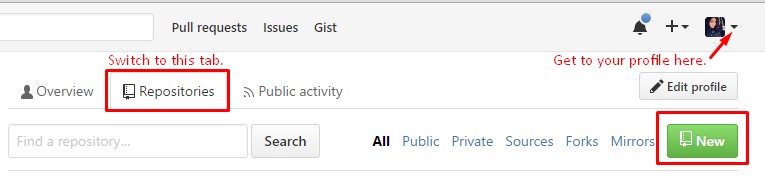
Next, we want you to create your own repository. To create a new repo, go to your
GitHub profile, select the Repositories
tab, and click New
.
Give your repo a logical name (i.e. my_page), a brief description, and select
public
. During this course we ask you to keep this repo public, because you will be learning how to host
a free public-facing website from your repo; however, you can switch this to private after our course is over if you wish.
Now that you have created the repo on GitHub you need to clone it to your local computer (just like you cloned the textAnalysis-Hub above). After you have the repo cloned you can make some edits to your README.md file using markdown and/or add more files. The README.md file, written in GitHub's simple markdown langauge, serves as a sort of welcome sign to invite other coders and developers to your repo and orient them to what they can find there. Here's an amazing resource of README examples to give you ideas of what kinds of things you can write here.
Your final task is to navigate on GitHub to your personal page repo, and follow our
tutorial steps to
add a collaborator. Add Dr. B (GitHub name: ebeshero) as a collaborator on your repo. After the
completion of this course you can remove any unwanted collaborators; however, for
this assignment we want you to practice adding at least one collaborator. Also when
creating your own repo you may need to change the settings to include an issues
board; follow these help.github.com directions to do so if the Issues
tab is not automatically there.
Welcome to the Git community! You have successfully completed the basic tasks of using a Git repository locally and remotely.